📖What you will learn
- How to integrate load testing with k6 into TeamCity
- How to detect performance issues earlier
- Different implementation paths, and when to use each
Introduction
Integrating performance tests into your CI pipelines helps catch performance issues earlier and shipping more stable and performant applications to production. In this tutorial, we will look into how to integrate performance testing with k6 in your TeamCity build setup.
k6 OSS is an open-source load testing tool for testing the performance of APIs, microservices and websites.
TeamCity is a continuous integration and delivery server built by JetBrains.
In order to follow along, you'll need to install k6 CLI locally on your host machine. This is necessary for TeamCity server to run k6 commands during the build step.
Write your performance test
To start, we will create a simple k6 test for our demo API. Your tests should be focused on endpoints and architecture that are important to your business.
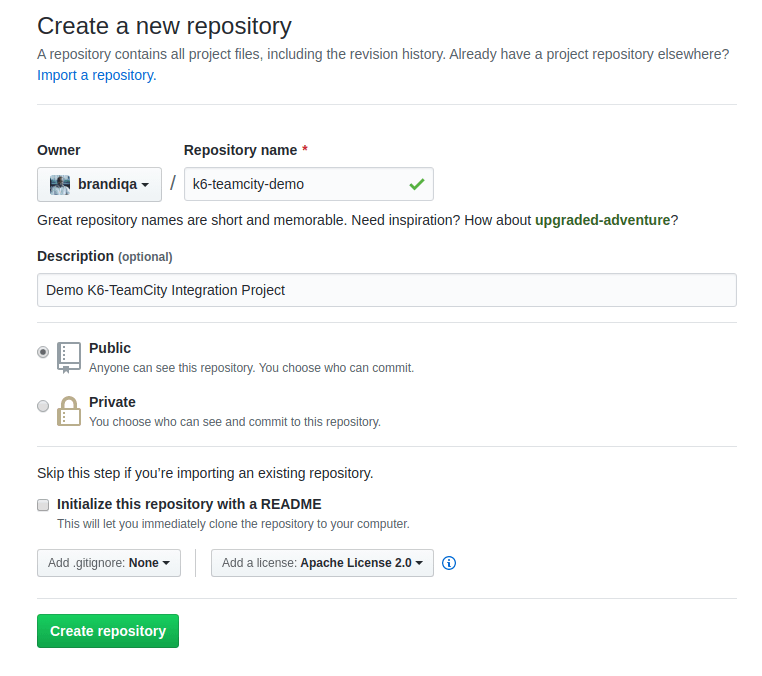
Let's start by creating a new repo using your favorite remote repository platform.
Next clone the repo to your local hard drive in order to start writing tests. The following test will run 50 Virtual Users continuously for a period of one minute, each VU execution generates one request and sleep for a period of 3 seconds. By design, this is a very simple script for illustrative purposes. Create the file below:
With k6 installed in your local machine, you can run your test locally in your terminal using the command: k6 run performance-test.js.
Configuration
Configuring thresholds in k6
The next step is to define your service level objectives, or SLOs around your application performance. SLOs are a vital aspect of ensuring the reliability of your systems and applications. If you do not currently have any defined SLAs or SLOs, now is a good time to start considering your requirements.
You can define SLOs as Pass/Fail criteria with Thresholds in your k6 script. k6 evaluates them during the test execution and inform about the Threshold results.
🧠 Failing the build
If a Threshold in your test fails, k6 will end with a non-zero exit code, which communicates to the CI tool that the step has failed.
Now, we will add one Threshold to our previous script to validate than the 95th percentile response time must be below 500ms.
Thresholds is a powerful feature providing a flexible API to define various types of Pass/Fail criteria in the same test run. For example:
- The 99th percentile response time must be below 700 ms.
- The 95th percentile response time must be below 400 ms.
- No more than 1% failed requests.
- The content of a response must be correct more than 95% of the time.
Check out the Thresholds documentation for extended information about the API and its usage.
Configuring the TeamCity build
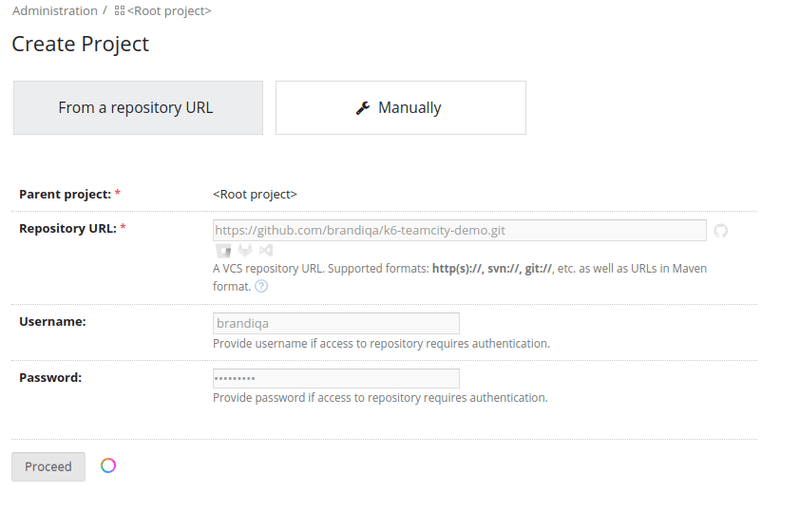
The Continuous Integration tool we are going to use in this tutorial is TeamCity. It is recommended that you download and install TeamCity for your OS. The cloud version is just for demo purposes. And the Docker version requires extra configuration steps to make it access the k6 CLI. Since this is not a beginners TeamCity tutorial, we'll skip to the part where we create our project. Provide the remote URL and credentials for your repo in the create new project form.
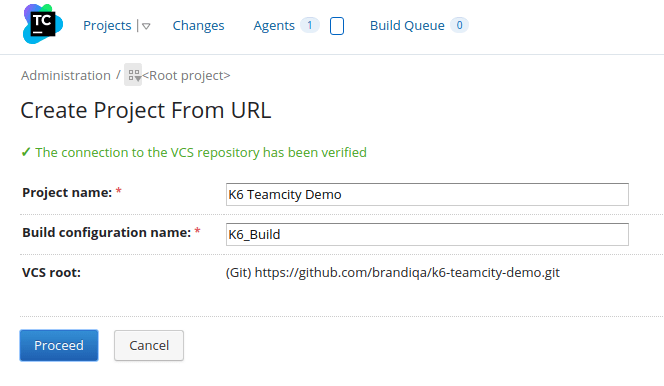
Next define your build configuration name.
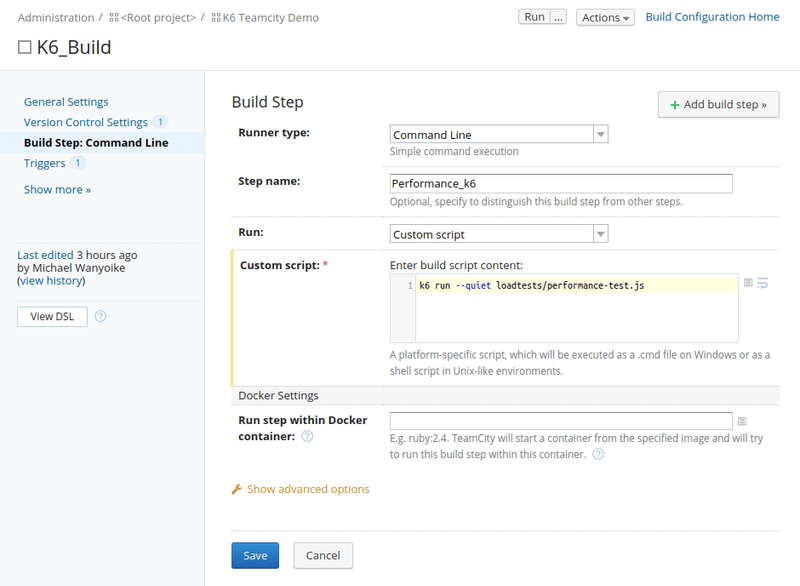
After specifying the build configuration name, we'll need to define a build step. Go to the Build Step tab and click Add Build Step. Provide the following parameters as defined in the screenshot below:
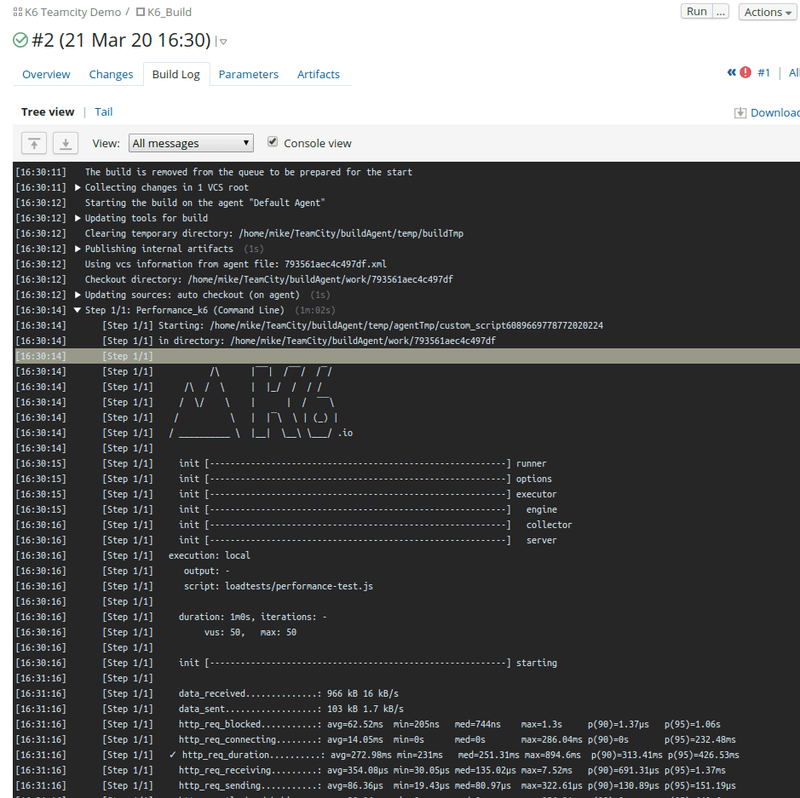
After saving the above setting, click on the Run button located at the top. TeamCity will first perform a git fetch to ensure it's running the most up-to-date version of your project code. It will then execute the build step. Below are the results you should get when the test completes:
In case the results fail, make sure you don't have another app or computer hogging network resources that could affect with the load performance testing.
Running the tests
There are two common execution modes to run k6 tests as part of the CI process.
- k6 run to run a test locally on the CI server.
- k6 cloud to run a test on Grafana Cloud k6 from one or multiple geographic locations.
When to consider cloud tests
You might want to trigger cloud tests in these common cases:
- If you want to run a test from one or multiple geographic locations (load zones).
- If you want to run a test with high-load that will need more compute resources than provisioned by the CI server.
If any of those reasons fits your needs, then running cloud tests is the way to go for you.
Before we start with the TeamCity configuration, it is good to familiarize ourselves with how cloud execution works, and we recommend you to test how to trigger a cloud test from your machine. Check out the cloud execution guide to learn how to distribute the test load across multiple geographic locations and more information about the cloud execution.
Triggering cloud tests
Now, we will show how to trigger cloud tests from TeamCity. If you do not have an account with K6 already, you should go here and register for one as well as start the free trial.
After that, copy your API token.
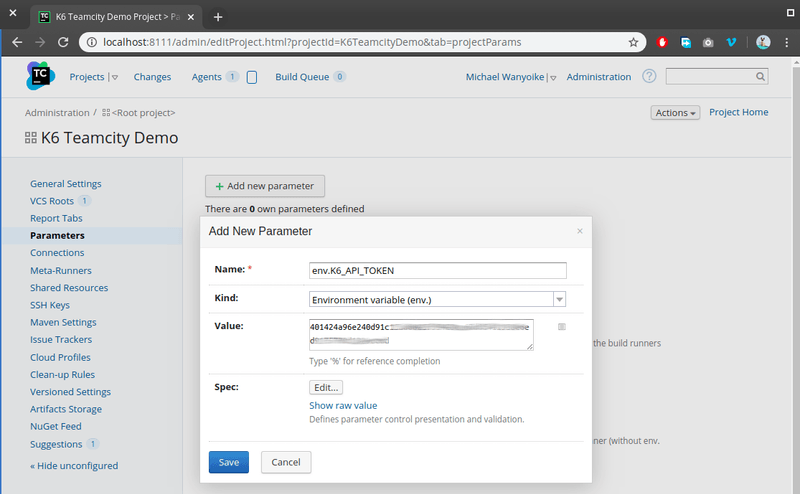
Head over to Project Settings > Parameters page and add K6_API_TOKEN to TeamCity as environment variable. Make sure to add the prefix env. as illustrated below.
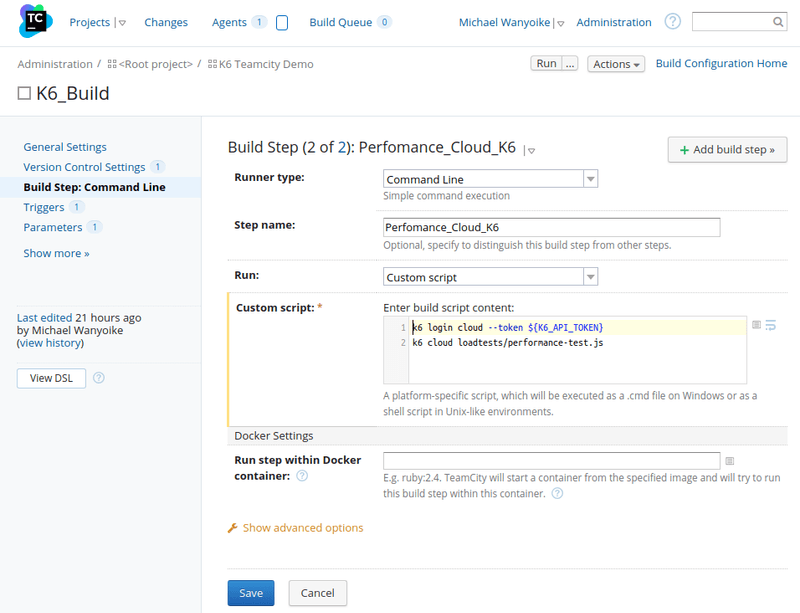
Now, you have to update or create a new k6 build step to execute k6 cloud run. You can disable the Performance_k6 build step we created earlier and then create a new one like this:
The changes to the previous configuration are:
Authenticate to Grafana Cloud k6 using K6_API_TOKEN environment variable when running the command k6 login cloud --token ${K6_API_TOKEN}.
Replace the k6 run command for the k6 cloud command to trigger cloud tests.
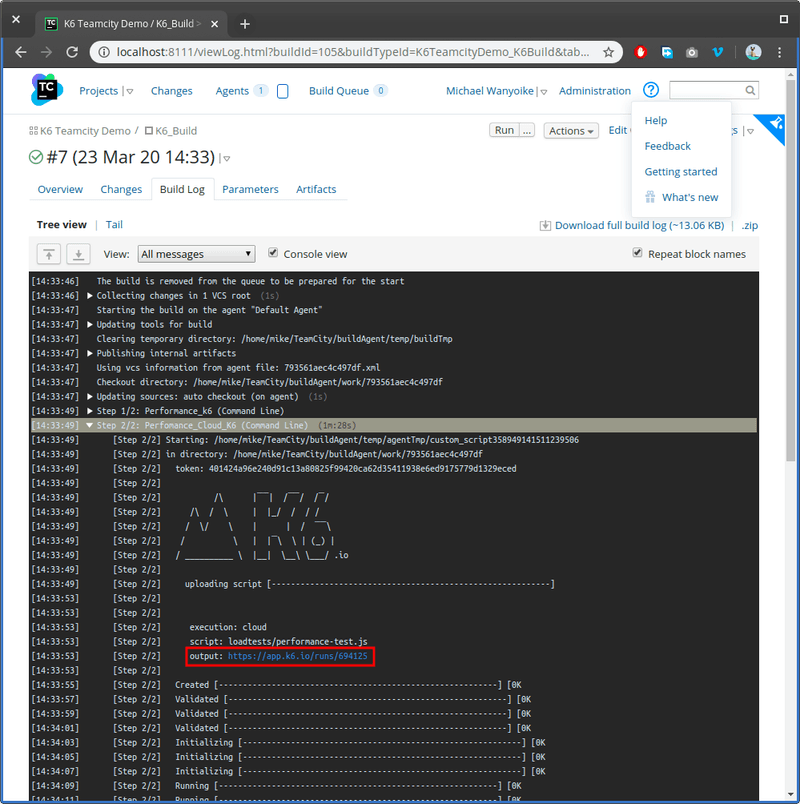
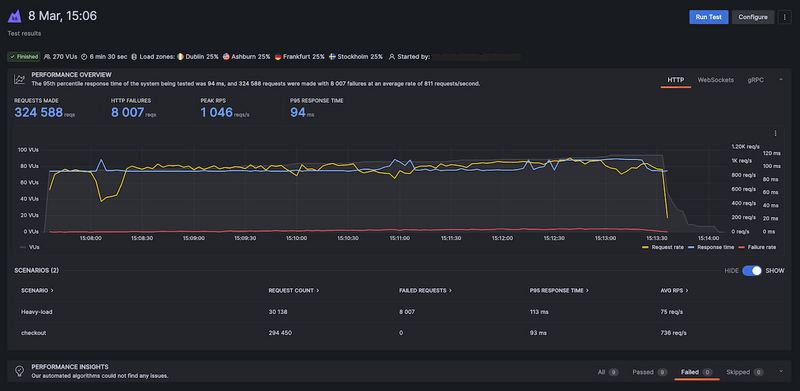
When all is done and good, we should see a screen like this from TeamCity build page:
It is essential to know that TeamCity prints the output of the k6 command, and when running cloud tests, k6 prints the URL of the test result in Grafana Cloud k6. You could navigate to this URL to see the result of your cloud test.
We recommend that you define your performance thresholds in the k6 tests in a previous step. If you have configured your thresholds properly and your test passes, there should be nothing to worry about. But when the test fails, you want to understand why.
In this case, navigate to the URL of the cloud test to analyze the test result. The result of the cloud service will help you quickly find the cause of the failure.
Nightly Triggers
Triggering a subset of performance tests at a specific time is a best practice for automating your performance testing.
It's common to run some performance tests during the night when users do not access the system under test. For example, to isolate larger tests from other types of testing or to generate periodically a performance report.
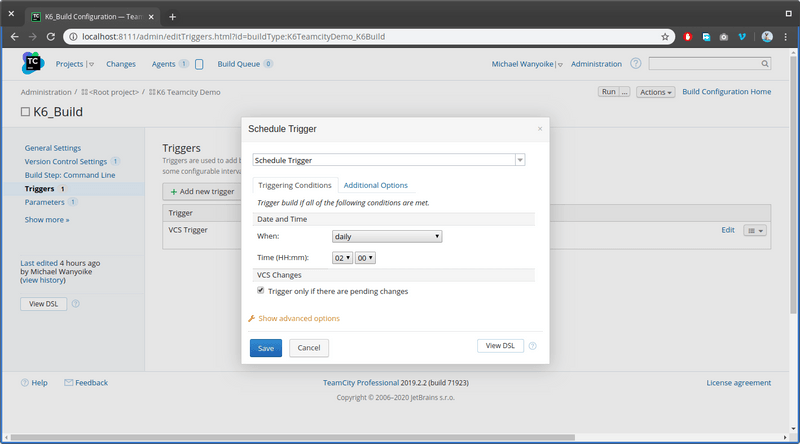
To configure scheduled nightly build that runs at a given time of a given day or night, head over to your TeamCity dashboard and navigate to your Build Step configuration page. While here, head over to the Triggers tab and click the Add new trigger button. A form will appear where you can select a Schedule Trigger and the schedule parameters. TeamCity also supports cron expressions. Check out CronMaker to help you generate scheduling expressions based on the Quartz cron format.
The screenshot below shows you how to schedule a trigger that runs at 2AM every night. You should be aware that the time zone is relative to the location where your TeamCity hosted machine is running. For this example it is in local time.
